American Bull: A Guide to Printing the Icon of Strength
The American Bull has long stood as a universal emblem of resilience, financial power, and unyielding determination. When translated into a physical object through 3D printing, this symbol transforms from a simple graphic into a tangible representation of energy and attitude. Whether you are a collector seeking a centerpiece for your office or an enthusiast looking to master complex anatomical details, the American Bull 3D model offers a compelling project. However, bringing such a realistic and muscular design to life requires more than just downloading an STL file and hitting print. Understanding the nuances of the model's structure is essential to achieving a professional finish that truly captures the spirit of the bull.
Understanding the Design Intent and Complexity
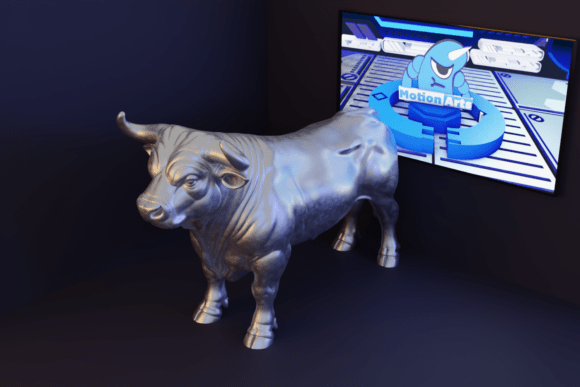
The American Bull model is not merely a silhouette; it is a study in anatomy and posture. Developed with a focus on realism, the design features well-defined muscles and a powerful stance that exudes strength. This level of detail is what makes it ideal for decorators and collectors who want a piece that commands attention. Yet, this complexity introduces specific challenges that beginners often overlook. The transition from a digital file to a physical sculpture relies heavily on how the printer interprets the geometry.
Many users assume that because a model is labeled "realistic," it will print flawlessly on any machine. This is a common misconception. The intricate muscle definition and the dynamic pose of the American Bull create significant overhangs and delicate surface areas. If approached without a clear strategy, these features can lead to sagging supports, visible layer lines on the face, or even structural failure during the print. Recognizing the intermediate difficulty level of this model is the first step toward success.
Common Mistakes in File Preparation and Slicing
One of the most frequent errors involves underestimating the need for support structures. The American Bull stands in a posture of action, meaning its legs and head often extend beyond the base plane. Without adequate support, gravity will distort the limbs, resulting in a slumped appearance that destroys the intended sense of power. While the file format is standard STL, the slicing settings must be tailored to the specific requirements of the anatomy.
Consider these critical preparation steps:
- Support Density: Do not use the default support settings. For the underside of the belly and the space between the legs, increase the support density slightly to prevent drooping, but ensure they are easy to remove later.
- Orientation Matters: Printing the bull perfectly upright might seem logical, but tilting the model slightly can reduce the amount of support material needed on the face and chest, preserving the smoothness of the coat texture.
- Infill Strategy: A solid structure is required for stability. Using a low infill percentage might save time and material, but it risks warping or breaking at the joints where the legs meet the body.
Ignoring these details often leads to a final product that looks cheap or broken, undermining the investment of time and filament. The goal is a sculpture that feels heavy and substantial, matching the imposing nature of the subject.
Choosing the Right Technology: FDM vs. Resin
The American Bull model is compatible with both FDM (Fused Deposition Modeling) and resin printers, but each technology yields different results and demands different workflows. Choosing the wrong one for your skill level or desired outcome can significantly impact satisfaction.
For those using FDM printers, the challenge lies in hiding layer lines on the curved surfaces of the muscles. Because the model is large and detailed, layer lines can become very apparent if the nozzle size is too large or the layer height is set too high. To achieve a professional finish, you may need to plan for extensive post-processing, including sanding and priming. This approach is excellent for creating larger, durable pieces, but it requires patience.
Conversely, resin printers excel at capturing the fine textures of the bull's hide and the sharp definition of the horns and hooves. However, resin prints are brittle compared to FDM plastics. If the American Bull is intended for a location where it might be handled frequently or bumped, the fragility of resin could be a drawback. Additionally, resin printing requires strict safety protocols regarding ventilation and skin protection, which some hobbyists may find cumbersome.
A practical approach is to match the printer to the end goal. If you want a display piece that highlights extreme detail and will remain untouched, resin is superior. If you want a robust decoration that can withstand handling, FDM with a high-quality filament like PETG or ABS is the better choice.
Evaluating Quality Before You Print
Before committing hours to a print job, it is vital to inspect the digital model. Even high-quality files can have minor errors introduced during conversion or upload. Look for non-manifold edges, holes in the mesh, or inverted normals that could cause the slicer to fail. Most slicing software includes a preview mode; use it to check for gaps in the support generation, particularly around the neck and under the chin.
Furthermore, consider the scale. The American Bull is designed to look powerful, but printing it too small can obscure the muscle definition, making it look like a generic blob. Conversely, printing it too large without adjusting the wall thickness can lead to weak points. Aim for a size that balances detail visibility with structural integrity. For most desktop printers, a height between 15cm and 25cm often provides the best balance of detail and manageability.
Post-Processing for Professional Results
The true potential of the American Bull model is often unlocked during post-processing. Removing supports is only the beginning. For FDM prints, careful sanding of the leg joints and the belly area is necessary to blend the support scars. Applying a primer helps unify the surface before painting, allowing you to bring out the depth of the muscles with shading techniques.
If you are using resin, washing and curing the part correctly is non-negotiable. Incomplete curing can leave the model sticky and prone to deformation over time. Once cured, the surface should be smooth, but light sanding may still be required to remove support marks from the hooves and horns.
By taking the time to refine the surface, you transform a raw 3D print into a genuine work of art. The effort put into finishing directly correlates to the perceived value of the piece. A well-finished American Bull does not just sit on a shelf; it communicates strength and precision.
Final Thoughts on Execution
The American Bull is more than just a file; it is an opportunity to demonstrate technical skill and artistic vision. By avoiding common pitfalls like poor support planning, incorrect orientation, and neglecting post-processing, you ensure that the final sculpture lives up to its reputation as a symbol of courage and power. Whether you are printing for personal enjoyment or for sale, treating the process with care and attention to detail will yield a result that truly embodies the spirit of the American Bull. Remember, the quality of your print is defined by the decisions you make before the first layer is laid down.